

Step by step hamper wrapping for special occasions
TL;DR:
- Hamper wrapping involves careful enclosure of gift collections using materials like cellophane, fabric, or shrink wrap to create a polished presentation. Each method requires precise measurement, proper tools, and controlled tension to produce an elegant finish suitable for any occasion. Sustainable options like reusable furoshiki fabric offer eco-friendly, keepsake-worthy alternatives that enhance the gifting experience.
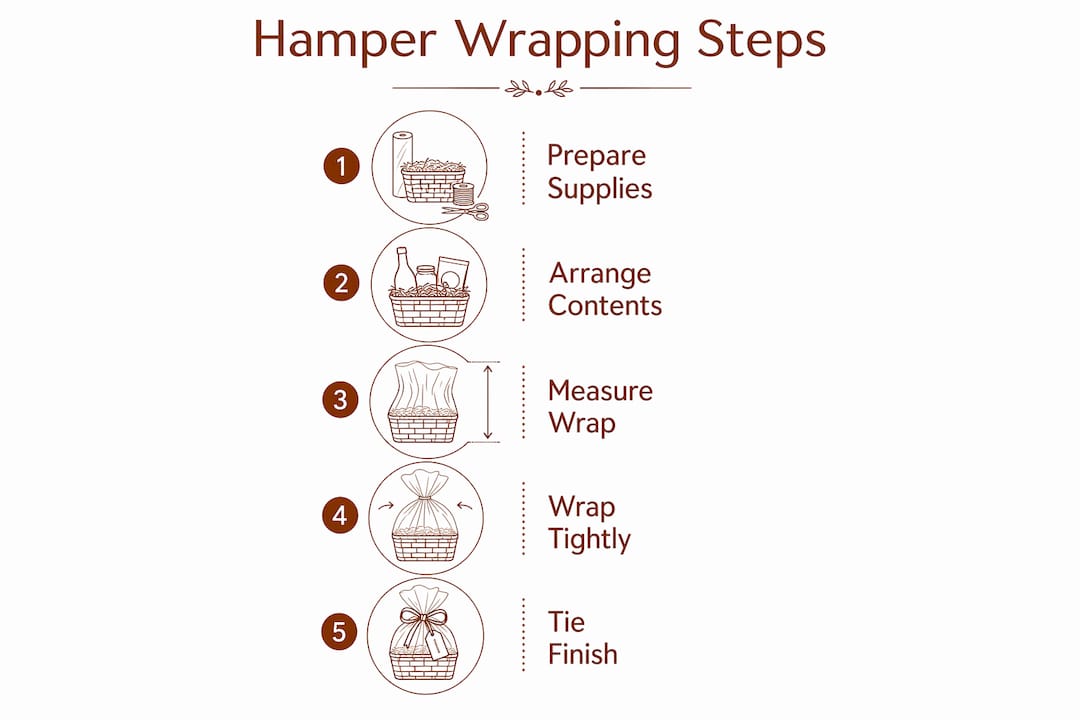
Hamper wrapping is the art of enclosing a curated gift collection within a chosen material, whether cellophane, furoshiki fabric, or shrink wrap, to create a presentation that feels as considered as the gifts inside. This guide walks you through each method with precision, covering the tools you need, the exact steps to follow, and the finishing touches that transform a basket of lovely things into a gift worth remembering. Whether you are preparing for a baby shower, a birthday, or a winter holiday, the right wrapping technique makes the difference between something that looks homemade and something that looks genuinely beautiful.
What tools and materials do you need for step by step hamper wrapping?
Preparation is the quiet foundation of every well-wrapped hamper. Gathering the right materials before you begin saves time and prevents the frustration of mid-wrap improvisation.
Cellophane and shrink wrap essentials
For cellophane wrapping, choose a roll that is at least 80 cm wide for a standard hamper, and opt for a thickness of 30 to 40 microns for a crisp, luminous drape. Shrink wrap bags or domes should be sized generously: the hamper must sit inside with at least 5 cm of clearance on all sides to allow even heat distribution. A heat gun rated between 300 and 500 watts is the standard tool for shrink wrapping; a hair dryer will not generate sufficient heat for a smooth, professional finish.
Furoshiki fabric and reusable wraps
A square furoshiki cloth between 70 and 100 cm is ideal for most gift hampers. The fabric must be large enough to wrap, knot, and still drape gracefully without excess bulk. Cotton, linen, and bespoke embroidered fabrics all work beautifully, and Nicholasandrose offers personalised reusable wraps that become a keepsake long after the hamper contents are enjoyed.
Additional tools and accessories
- Sharp fabric scissors or a rotary cutter for clean, straight cuts
- Double-sided tape and clear tape for cellophane work
- Wired ribbon in 60 to 70 cm lengths for structured bows
- Wood wool, shredded paper, or tissue paper for internal filler
- A turntable or lazy Susan for even heat application during shrink wrapping
- Gift tags, dried lavender sprigs, or small botanical accents for finishing
- A tape measure and marker for accurate sizing
Pro Tip: Cut your cellophane at least 30 cm larger than your calculated measurement on every side. It is far easier to trim excess than to re-cut an undersized sheet.
| Material | Recommended size or specification |
|---|---|
| Cellophane roll | Minimum 80 cm wide, 30–40 micron thickness |
| Furoshiki cloth | 70–100 cm square for standard hampers |
| Shrink wrap bag | 5 cm clearance on all sides of hamper |
| Wired ribbon | 60–70 cm per bow for structured finish |
| Heat gun | 300–500 watts for even shrink application |
How do you wrap a hamper step by step using cellophane?
Cellophane wrapping rewards patience and precision. The goal is a smooth, gathered finish at the top with no sagging sides and a neat, taped base.
- Measure your cellophane. Take the height of your hamper, multiply it by three, then add 30 cm. This sizing formula gives you sufficient material to gather above the rim and tuck cleanly beneath the base.
- Cut and lay flat. Spread the cellophane on a clean, flat surface. Place your hamper in the centre, rotated 45 degrees so one corner of the cellophane points toward you.
- Lift the near corner first. Bring the closest point of cellophane up and over the front of the hamper, smoothing it gently against the basket weave or box sides.
- Gather the sides evenly. Lift both side corners simultaneously, drawing the cellophane upward in uniform pleats. Professional wrappers create pleats of 2 to 3 inches for structural integrity and a polished aesthetic. Secure each side with a small piece of double-sided tape at mid-height to hold the pleats in place.
- Bring up the final corner. Lift the remaining corner and gather all four sides together, holding them 4 to 6 inches above the basket rim for the best visual proportion.
- Tie with wired ribbon. Wrap approximately 60 cm of wired ribbon around the gathered cellophane at the point where it meets, tie a firm knot, then shape the ribbon into a multi-loop bow. A 6-loop wired bow adds structure and elegance that a simple tied ribbon cannot replicate.
- Finish the base. Turn the hamper carefully and fold excess cellophane under the base in neat triangular folds, securing each fold with clear tape. This prevents sagging and keeps the wrap taut.
Pro Tip: If your hamper contains tall items, place them at the back and shorter items at the front before wrapping. This creates a natural tiered display visible through the cellophane.
Tension and control are the most crucial factors in wrapping that determine whether the finished result looks refined or rushed. Keep steady, even pressure on the cellophane throughout, and never pull so hard that the material tears at the corners.
What are the steps for wrapping hampers with eco-friendly furoshiki fabric?
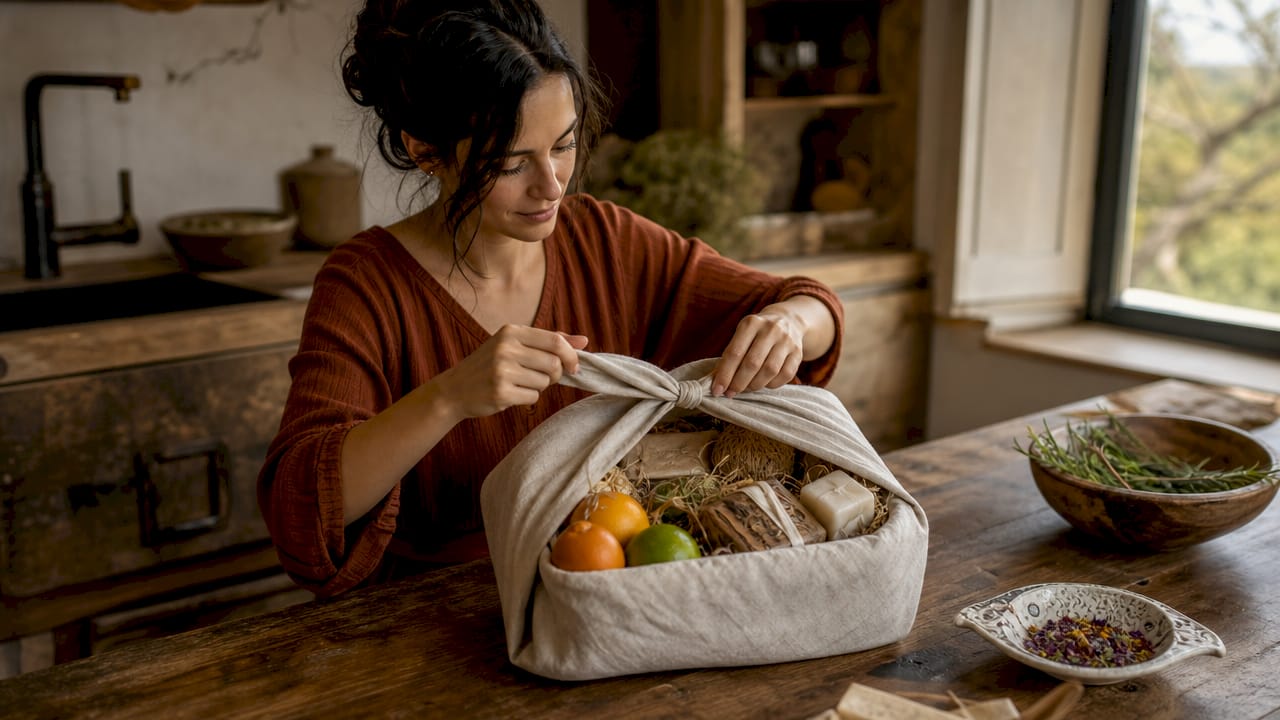
Furoshiki is the Japanese art of wrapping objects in cloth, and the Japanese Ministry of the Environment promotes it as an established eco-friendly practice rather than a passing trend. For baby showers and newborn gifts, it carries particular meaning: the wrap itself becomes a second gift, a piece of fabric that can be used again and again.
- Choose and prepare your cloth. Select a square cloth of 70 to 100 cm. Lay it flat on a clean surface, pattern side down, oriented as a diamond with one corner pointing toward you.
- Centre your hamper. Place the hamper in the middle of the cloth, slightly toward the corner closest to you. The hamper should sit diagonally on the fabric.
- Tie the first two corners. Lift the corner nearest to you and the corner furthest away, bringing them up and over the top of the hamper. Tie them together in a firm square knot, known as the Murasaki knot, directly above the centre of the hamper.
- Wrap the remaining corners. Take the two side corners and bring them around the hamper, crossing them at the front or back before tying them in a decorative bow at the top or side. These corners can be shaped into soft loops for a more refined finish.
- Adjust tension throughout. The fabric holds the hamper through tension and tight knots rather than tape, so smooth out any slack by gently pulling the cloth taut at each stage before tying.
- Add finishing touches. Tuck a small sprig of dried lavender or a personalised gift tag beneath the knot. For a baby shower hamper, a Nicholasandrose embroidered wrap with the newborn’s name woven into the fabric transforms the presentation into a lasting memento.
Pro Tip: For heavier hampers, choose a linen or canvas furoshiki rather than lightweight cotton. The denser weave holds its shape and supports the weight without the knots loosening.
Reusable fabric wrapping offers a keepsake quality that cellophane and shrink wrap simply cannot provide, making it the most thoughtful choice for sentimental occasions like newborn milestones and first birthdays. You can explore furoshiki wrapping in the UK in more depth if you want to master additional knot styles and fabric combinations.
How do you use shrink wrap to wrap a hamper safely and attractively?
Shrink wrapping creates a taut, transparent shell around the hamper that protects contents during transport and gives a professional, retail-quality finish. The technique requires care, but the result is genuinely impressive.
- Select the correct bag size. Choose a shrink wrap bag or dome with at least 5 cm of clearance around the entire hamper. A bag that is too tight will tear before it shrinks evenly.
- Place the hamper inside. Lower the hamper into the bag with the open end of the bag at the bottom. Smooth out any large air pockets by pressing gently on the sides.
- Seal the base. Fold the excess bag material under the hamper base and secure with clear tape. This creates a stable platform and a clean starting point for heat application.
- Position on a turntable. Place the hamper on a turntable or rotating surface. Continuous rotation during heat application is what separates an even, professional shrink from a patchy, uneven one.
- Apply heat carefully. Hold the heat gun approximately 15 to 20 cm from the surface. Start at the edges and corners, working inward in slow, steady passes. Never hold the gun in one position; continuous movement prevents holes.
- Finish and decorate. Once the wrap is smooth and taut, add a soft fabric ribbon bow at the top. Avoid sharp-edged decorations that could puncture the wrap.
Safety note: Always use a heat gun in a well-ventilated space and keep it moving at all times. A stationary heat gun will melt holes in the wrap within seconds and may pose a fire risk if held near flammable filler materials.
Pro Tip: Shrink wrap and wood wool filler are a risky combination. Use shredded paper or tissue paper inside hampers you plan to shrink wrap, as wood wool can shift and create uneven pressure points that distort the finished shape.
How to pack and prepare wrapped hampers for transport or gifting occasions
A beautifully wrapped hamper deserves to arrive in the same condition it left your hands. Whether you are carrying it to a baby shower or sending it by courier, the packing stage is where presentation meets practicality.
- Stabilise contents before wrapping. Arrange items so heavier pieces sit at the base and nothing shifts when the hamper is lifted. Use wood wool or shredded paper generously to fill gaps and cushion fragile items.
- Test the wrap tension. Gently lift the wrapped hamper and check that nothing moves inside. A loose wrap is a sign that the internal arrangement needs adjustment before the hamper travels.
- For courier shipping, place the wrapped hamper inside a sturdy cardboard box with at least 5 cm of bubble wrap or foam padding on all sides. Couriers require parcels to be well-packaged, and most offer basic parcel protection with upgrade options at checkout.
- Protect the bow. Place a loose sheet of tissue paper over the top of the bow before closing the shipping box. This prevents the ribbon from being crushed by the box lid.
- Add personalised tags last. Attach gift tags, name labels, or embroidered fabric tags after the hamper is fully wrapped and stable. Attaching them too early risks tearing or displacement during the wrapping process.
- For event presentation, carry hampers flat on a tray rather than by the bow or ribbon. The bow is decorative, not structural, and will distort under the weight of the hamper.
For baby shower hampers in particular, the sustainable newborn gift presentation is as meaningful as the contents. A reusable fabric wrap that survives the journey intact becomes part of the gift story.
Key takeaways
The most effective hamper wrapping combines precise measurement, controlled tension, and a finishing material chosen to match both the occasion and your values as a gift-giver.
| Point | Details |
|---|---|
| Measure before you cut | Use the height-times-three formula for cellophane to avoid undersized sheets and wasted material. |
| Tension controls the result | Whether using cellophane, furoshiki, or shrink wrap, even tension throughout prevents sagging and distortion. |
| Furoshiki is the eco-conscious choice | A 70 to 100 cm square cloth wraps most hampers and becomes a reusable keepsake for the recipient. |
| Shrink wrap demands safety | Keep the heat gun moving at all times and start at edges to avoid holes and fire risk. |
| Pack for the journey | Stabilise contents before wrapping and add 5 cm of padding inside any courier box to protect the presentation. |
Why I always reach for fabric first
I have wrapped hundreds of hampers over the years, and the single most common mistake I see is choosing the wrapping material last, as an afterthought. People spend hours curating the perfect collection of gifts and then grab whatever cellophane roll is nearest. The wrap is not packaging. It is the first impression, and for occasions like baby showers and newborn milestones, it carries genuine emotional weight.
My honest preference is reusable fabric, and not simply for environmental reasons, though those matter deeply. Fabric wrapping forces you to slow down. The knot-tying process is deliberate and tactile in a way that pulling cellophane over a basket simply is not. When you tie a Murasaki knot in a beautifully embroidered cloth, you are creating something that the recipient will keep. I have seen Nicholasandrose wraps used as nursery wall hangings, as swaddle cloths, and as keepsakes folded into memory boxes. No cellophane wrap has ever ended up in a memory box.
The practical advice I would add, beyond what any tutorial covers, is this: practise your chosen technique on an empty basket before you wrap the real thing. The first attempt at a furoshiki knot rarely looks elegant. The third one always does.
— Helen
Wrap your next milestone gift beautifully
If this hamper wrapping tutorial has inspired you to move beyond single-use cellophane, the Nicholasandrose Baby & Beyond collection offers a considered range of luxury reusable fabric wraps designed specifically for newborn gifts, baby showers, and first-year milestones. Each wrap can be personalised through embroidery, so the recipient’s name, birth date, or a short message becomes part of the fabric itself. These are wraps that survive the unwrapping, the washing, and the years that follow. Explore the full range and discover how thoughtful presentation can become a gift in its own right.
FAQ
What is the correct cellophane size for wrapping a hamper?
Measure the hamper height, multiply by three, then add 30 cm. This gives enough material to gather above the rim and fold neatly beneath the base for a professional finish.
How do you keep furoshiki fabric secure without tape?
A furoshiki wrap holds through tension and firm square knots rather than adhesive. A 70 to 100 cm cloth tied in a Murasaki knot provides sufficient grip for most standard hampers.
Is shrink wrapping safe for hampers with food items?
Shrink wrapping is safe for hampers containing packaged food, provided the heat gun is kept moving and never held stationary over any single point. Use shredded paper rather than wood wool as filler to reduce fire risk during heat application.
What is the best eco-friendly alternative to cellophane for hamper wrapping?
Furoshiki fabric wrapping is the most established sustainable alternative, endorsed by the Japanese Ministry of the Environment as a zero-waste gifting practice. Personalised reusable wraps from Nicholasandrose also serve as a lasting memento for the recipient. You can find a broader selection of green gift wrap options suited to special occasions.
How do you wrap a hamper for posting by courier?
Wrap the hamper securely in cellophane or shrink wrap, then place it inside a sturdy cardboard box with at least 5 cm of bubble wrap padding on all sides. Most couriers offer parcel protection upgrades at checkout for added peace of mind.
Recommended
- Step by Step Eco Gift Wrapping for Personalised Gifts – Nicholas & Rose Limited
- Luxury Christmas Wrapping Tutorial for Eco-Conscious Gifts – Nicholas & Rose Limited
- Luxury Gift Wrap Folding Techniques Guide for Fabric – Nicholas & Rose Limited
- Wrapping Gifts Without Paper: Elegant Fabric Solutions – Nicholas & Rose Limited