

Create eco-friendly DIY embroidered gift wrap in 2026
Every year, UK households discard millions of metres of wrapping paper destined for landfill, often before a newborn even arrives home. Personalised embroidered fabric wraps offer a sustainable alternative that transforms gift presentation into a cherished keepsake. This guide equips you to craft beautiful, reusable wraps that honour eco-conscious values whilst adding heartfelt touches to baby shower and newborn gifts.
Table of Contents
- What You Need: Materials And Tools For Embroidered Gift Wrap
- Step-By-Step Guide To Creating Embroidered Gift Wrap
- Common Mistakes And Troubleshooting Tips
- Caring For And Reusing Your Embroidered Gift Wrap
- Expected Results And Benefits Of Diy Embroidered Gift Wrap
- Explore Sustainable Gift Solutions With Nicholas & Rose
- FAQ
Key takeaways
| Point | Details |
|---|---|
| Eco-friendly fabrics reduce landfill waste | Organic cotton and linen provide hypoallergenic, sustainable wrapping suitable for newborns. |
| Simple embroidery techniques personalise gifts | Basic stitches like backstitch and satin stitch create meaningful initials or baby motifs. |
| Reusable wraps save money and resources | Each wrap replaces approximately 20 rolls of paper over its lifecycle. |
| Time investment is moderate for meaningful results | Beginner projects take around 4 hours to complete with quality results. |
What you need: materials and tools for embroidered gift wrap
Selecting the right materials ensures your embroidered wrap remains safe for babies whilst supporting sustainability goals. Start with organic cotton and linen fabrics, which provide hypoallergenic, sustainable wrapping suitable for newborns. These natural fibres feel soft against delicate skin and wash beautifully without degrading.
For embroidery threads, choose organic cotton or recycled polyester threads that reduce energy usage whilst maintaining durability. These eco-friendly options come in vibrant colours safe for baby items and hold their hue through repeated washing.
Essential tools for your project:
- Embroidery needles sized 5-9 for medium-weight fabrics
- 6-8 inch embroidery hoops to maintain even tension
- Sharp fabric scissors for clean cuts
- Water-soluble stabiliser (optional but recommended for beginners)
- Transfer paper or pencil for design placement
- Iron for pressing finished edges
Pro Tip: Purchase fabric in 50x70cm pieces to accommodate various gift sizes whilst minimising cutting waste.
Safety remains paramount when creating wraps for newborns. Verify that all fabrics and threads carry certifications like GOTS (Global Organic Textile Standard) or OEKO-TEX Standard 100. These labels confirm materials are free from harmful chemicals and dyes. Avoid embellishments like buttons or beads that pose choking hazards.
| Material | Purpose | Sustainability Benefit |
|---|---|---|
| Organic cotton fabric | Base wrap material | Pesticide-free cultivation reduces soil degradation |
| Recycled polyester thread | Embroidery stitching | Diverts plastic waste from landfills |
| Water-soluble stabiliser | Prevents fabric puckering | Biodegradable alternative to synthetic options |
When shopping, prioritise UK suppliers to reduce transportation emissions. Many offer sample packs that let you test fabric weights before committing to larger quantities. For additional guidance on selecting premium materials, explore reusable gift wrap tips that balance luxury with environmental responsibility.
Step-by-step guide to creating embroidered gift wrap
With materials assembled, you’re ready to transform plain fabric into personalised treasure. Follow these steps to achieve professional results even as a beginner.
1. Prepare your fabric base
Cut fabric to your desired size, adding 2cm on each edge for hemming. Press with a warm iron to remove wrinkles and create a smooth stitching surface. If using stabiliser, attach it to the fabric’s wrong side now.
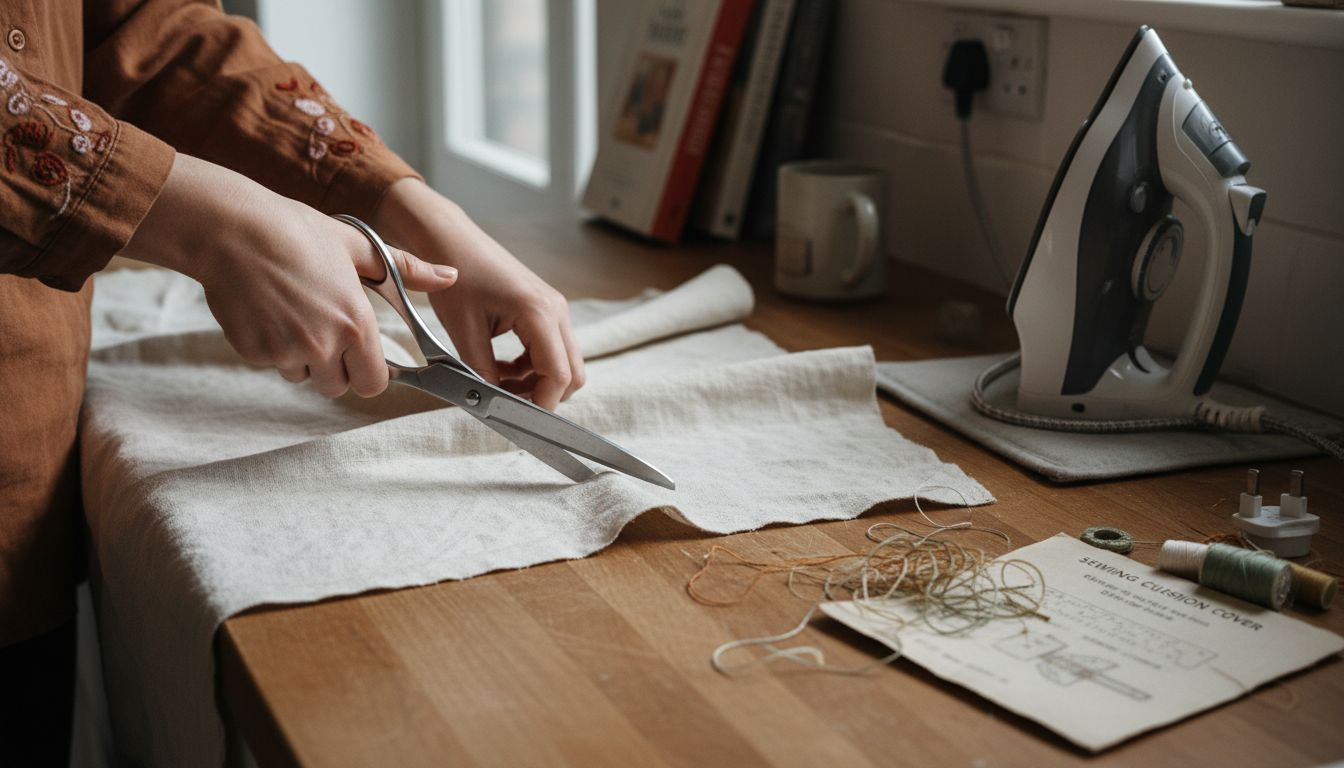
2. Transfer your design
Choose a simple motif like baby initials, hearts, or stars. Trace your design onto transfer paper, then position it on the fabric’s right side. Use a warm iron to transfer the pattern, or lightly sketch with a water-soluble pencil. Keep designs centred or placed in one corner for visual impact.
3. Mount fabric in your hoop
Place the inner hoop ring under your fabric, then press the outer ring over both. Tighten the screw until fabric sits drum-tight without puckering. This tension prevents uneven stitches and makes embroidery significantly easier.
4. Embroider your chosen motif
Thread your needle with approximately 40cm of embroidery thread (use two strands for delicate work, three for bolder lines). Start with backstitch for outlines and letters, pulling thread gently to avoid bunching. Fill shapes with satin stitch by creating parallel lines close together. Work steadily rather than rushing.
Pro Tip: Typical beginner embroidery projects on gift wrap-sized fabric take around 4 hours to complete, so schedule breaks to maintain stitch quality.
5. Finish edges for durability
Remove fabric from the hoop and trim stabiliser if used. Fold edges under 1cm, press, then fold again and stitch or use fabric glue for a clean hem. Alternatively, bind edges with coordinating bias tape for a polished look. Wash the completed wrap in cold water to remove transfer markings, then air dry flat.
For wrapping techniques that showcase your embroidery beautifully, review how to tie fabric gift wrap to complement your handwork.
Common mistakes and troubleshooting tips
Even with careful preparation, embroidery challenges arise. Recognising these issues early saves frustration and improves your final wrap.
Uneven tension causing puckering
Fabric gathers around stitches when hoop tension is too loose or thread is pulled too tightly. Fix this by re-mounting fabric drum-tight in your hoop and maintaining consistent, gentle thread tension. Using stabiliser prevents distortion, especially on lightweight fabrics.
Skipping stabiliser causes embroidery distortion
Without stabiliser, stitches sink into fabric weave, creating irregular patterns. Always use appropriate fabric stabiliser matched to your base material. Water-soluble varieties wash away cleanly, leaving crisp embroidery behind.
Wrong hoop size causes uneven stitching
Hoops smaller than 6 inches force constant repositioning, whilst oversized hoops don’t provide adequate tension. Choose hoop sizes between 6-8 inches for wraps, ensuring your entire design fits comfortably within the frame.
Rushing causes sloppy stitches
Hurried embroidery produces uneven spacing and loose thread ends. Plan 3-5 hours for completion and take breaks every 45 minutes to rest your eyes and hands. Quality improves dramatically when you work at a steady, unhurried pace.
Pro Tip: Practice your chosen stitches on scrap fabric before starting your actual wrap to build muscle memory and confidence.
Thread tangling and knotting
Thread twists during stitching, creating knots that disrupt your rhythm. Let your needle dangle freely every few stitches, allowing thread to untwist naturally. Keeping thread lengths under 40cm also reduces tangling.
For additional troubleshooting strategies and expert insights, explore reusable gift wrap tips that address common crafting obstacles.
Caring for and reusing your embroidered gift wrap
Proper maintenance extends your wrap’s lifespan, maximising its environmental and financial benefits. Treat embroidered fabric with the same care you’d give fine linens.
Washing instructions
Hand wash wraps in cool water with gentle, eco-friendly detergent. Alternatively, machine wash on a delicate cycle inside a mesh laundry bag to protect embroidery. Avoid harsh chemicals or bleach that fade colours and weaken natural fibres.
Drying methods
Air dry wraps flat on a clean towel or hang on a clothesline away from direct sunlight. Never tumble dry, as heat damages embroidery threads and shrinks natural fabrics. Press lightly with a warm iron whilst slightly damp for best results.
Storage solutions
Fold wraps neatly and store in a dry, cool cupboard or drawer. Keep them away from direct sunlight to prevent colour fading. Storing wraps in breathable fabric bags protects against dust whilst allowing air circulation.
Maximising reuse
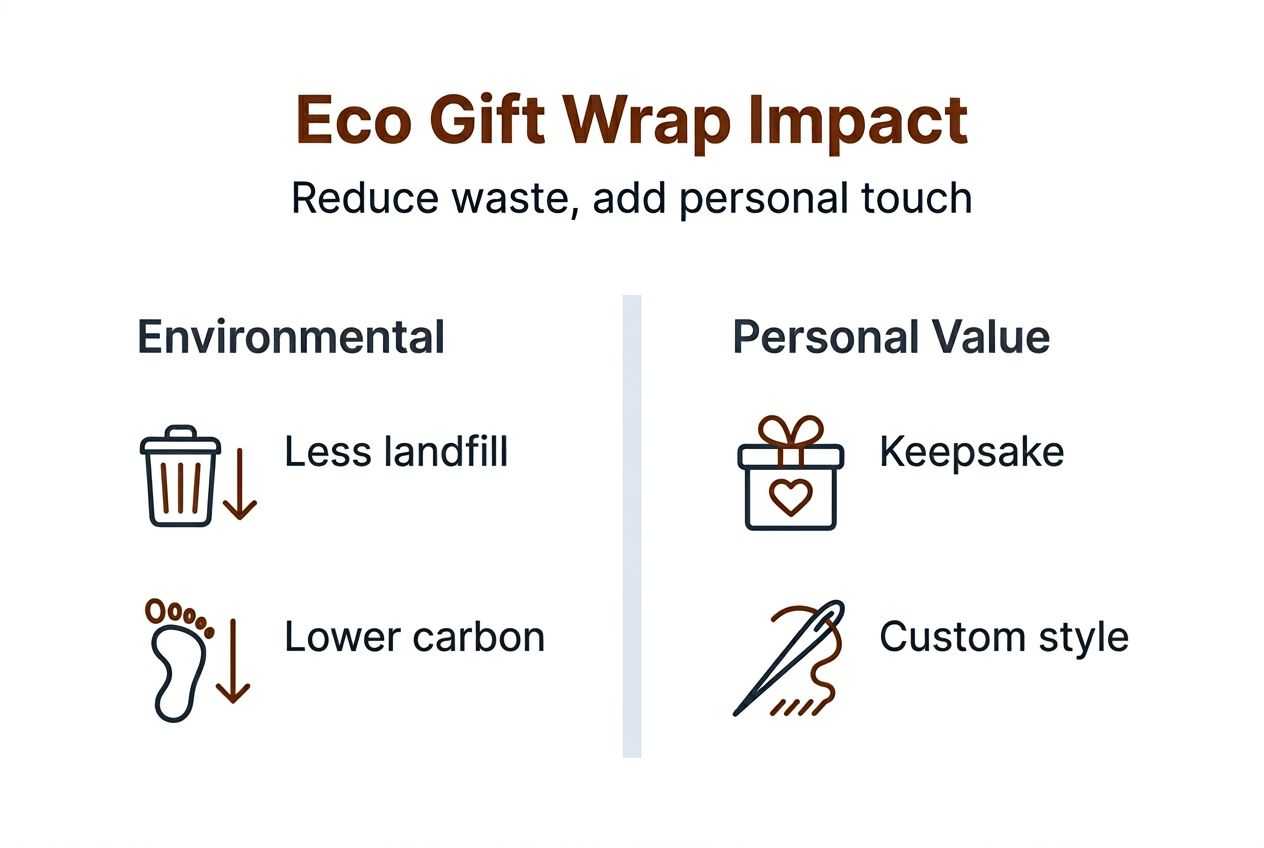
Reusable fabric gift wraps can replace approximately 20 rolls of disposable wrapping paper over their lifecycle. Encourage gift recipients to return wraps at family gatherings or pass them forward, creating a sustainable gifting cycle. Track each wrap’s journey by embroidering the creation year on a corner.
Pro Tip: Create a small tag explaining care instructions and the environmental benefits to inspire recipients to reuse your handmade wrap.
For detailed folding and presentation techniques that keep wraps pristine between uses, consult premium gift wrapping instructions.
Expected results and benefits of DIY embroidered gift wrap
Understanding what to expect helps you appreciate the full value of your handmade creation beyond immediate aesthetics.
Time and cost investment
DIY embroidered gift wrap typically requires 3-5 hours and costs less than buying multiple rolls of paper over time. Initial material expenses range from £15-25 per wrap, but this investment pays dividends through repeated use. Compare this to £3-5 per gift for disposable paper that lasts minutes.
Emotional value
Personalised embroidery transforms gift wrap into a keepsake that commemorates special moments. Recipients treasure wraps featuring baby names or birth dates, often repurposing them as wall hangings or blanket edging. This emotional connection strengthens family bonds and creates lasting memories.
Environmental impact
Using reusable wraps reduces landfill waste and carbon footprint substantially compared to disposable paper. Each fabric wrap diverts approximately 20 paper sheets from waste streams whilst requiring significantly less energy to produce than virgin paper products.
| Comparison Factor | DIY Embroidered Wrap | Disposable Paper |
|---|---|---|
| Initial cost | £15-25 | £3-5 per use |
| Lifespan uses | 20+ occasions | Single use |
| Environmental waste | Minimal (reusable) | High (landfill bound) |
| Emotional value | High (personalised keepsake) | Low (discarded quickly) |
Skill development benefits
- Embroidery improves fine motor skills and concentration
- Creative expression reduces stress and promotes mindfulness
- Handcraft skills become family traditions passed to children
- Confidence grows with each completed project
For broader perspectives on sustainable gifting advantages, explore benefits of reusable gift wrap that extend beyond individual projects.
Explore sustainable gift solutions with Nicholas & Rose
Your journey towards eco-conscious gifting doesn’t end with one embroidered wrap. Nicholas & Rose offers extensive resources to support your sustainable lifestyle, from expert tutorials to quality materials that align with your values.
Discover curated collections designed specifically for newborn and toddler celebrations, featuring ready-made embroidered wraps alongside DIY inspiration. Access detailed guides that expand your embroidery skills whilst staying true to eco-luxury principles. Every purchase supports UK-based sustainable practices, reducing your gifting footprint whilst elevating presentation standards. Explore the complete range today and transform how you celebrate life’s precious moments.
FAQ
How do I choose the right fabric for baby gift wrap?
Select natural, organic fabrics like cotton or linen that are hypoallergenic and safe for newborns. Verify certifications such as GOTS or OEKO-TEX Standard 100 to ensure materials are free from harmful chemicals. Avoid synthetic materials with toxic dyes or finishes that could irritate sensitive skin.
Can beginners create beautiful embroidered gift wraps easily?
Yes, beginners can complete wraps with simple stitches in under 5 hours using proper guidance and tools. Start with basic backstitch for outlines and satin stitch for filling small shapes. Practice on scrap fabric first, and patience combined with steady work improves stitch quality and enjoyment significantly.
How do I maintain and reuse embroidered gift wrap properly?
Wash wraps gently in cold water using eco-friendly detergent, either by hand or on a delicate machine cycle. Air dry flat or hang away from direct sunlight to prevent fading and damage. Store folded in a dry, cool place, and encourage recipients to return wraps for continued family use.
What are common embroidery mistakes and how can I fix them?
Uneven tension causing puckering can be fixed using stabilisers and maintaining drum-tight hoop tension. Skipping stabiliser leads to distorted stitches, so always use appropriate backing for your fabric weight. Rushing leads to sloppy stitches; take regular breaks and work steadily for consistent, beautiful results.
Recommended
- Luxury Eco Christmas Wrapping Tutorial with Fabric Gifts – Nicholas & Rose Limited
- Step by Step Eco Gift Wrapping for Personalised Gifts – Nicholas & Rose Limited
- Luxury Christmas Wrapping Tutorial for Eco-Conscious Gifts – Nicholas & Rose Limited
- Christmas Eco Wrapping Steps for Elegant Sustainable Gifts – Nicholas & Rose Limited