

Embroidery gift wrap guide for newborn and baby gifts
TL;DR:
- Embroidery gift wraps transform reusable fabric into meaningful keepsakes by personalizing motifs, names, or dates. They promote sustainability and emotional connection, especially for newborn and baby shower gifts, over disposable paper wrapping. Proper planning, materials, and techniques ensure these elegant, durable wraps can be cherished and reused for years.
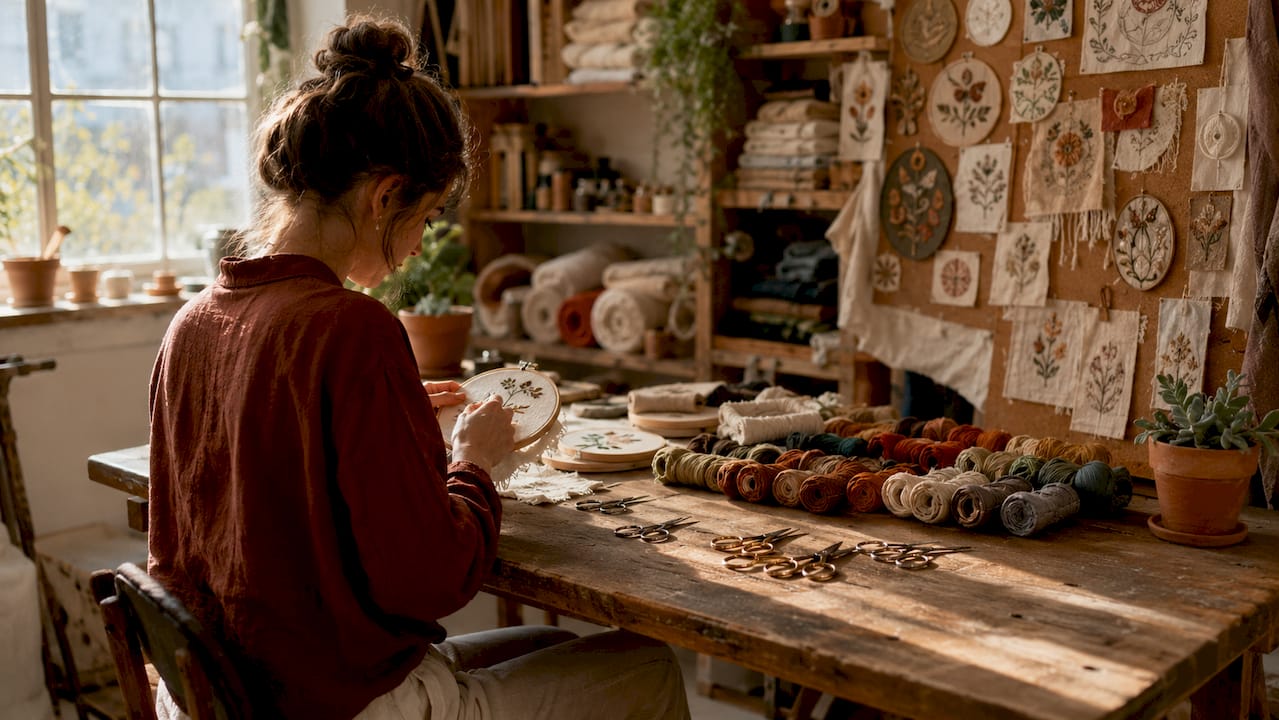
Embroidered gift wrap is the art of stitching personalised motifs, names, or dates directly onto reusable fabric before folding or sewing it into a wrap, pouch, or envelope. Where traditional paper wrapping is discarded within moments, often before a newborn has even drawn their first breath, an embroidered fabric wrap becomes a keepsake as meaningful as the gift it holds. This guide walks you through every stage of the process, from choosing the right linen to finishing with a pearl button closure, so you can create something truly bespoke for a baby shower, newborn celebration, or child’s birthday.
What is an embroidery gift wrap guide and why does it matter?
An embroidery gift wrap guide covers the materials, design planning, stitching methods, and finishing techniques needed to transform plain fabric into a personalised, reusable gift wrap. The primary value of embroidered wraps lies in turning packaging into a keepsake through personalisation, making the wrap as meaningful as the gift itself. For newborn gifts and baby showers in particular, this matters enormously. A wrap stitched with a baby’s name and birth date is not discarded on the nursery floor. It is folded away, treasured, and reused for years.
Fabric wraps also carry a quiet environmental dignity that paper cannot match. Modular construction of reusable wraps allows for versatile uses and greater environmental friendliness, emphasising the clear advantage over single-use paper. When you choose embroidered fabric, you are choosing a ritual of thoughtful gifting over a moment of waste.
What materials and tools do you need for embroidered fabric wraps?
The right materials determine whether your finished wrap feels like a luxury heirloom or a craft project. Linen and cotton are the preferred choices for durable, reusable wraps, offering a crisp hand-feel, beautiful drape, and a surface that accepts embroidery thread with grace. Medium-weight woven fusible interfacing applied to the embroidered flap prevents linen stretching and flap rippling during stitching, improving structure and the overall luxury feel of the finished piece.
Stabilisers are the unsung heroes of clean embroidery. Choosing the correct stabiliser type is vital: heavy-weight water-soluble stabilisers suit delicate fabrics and ensure design integrity with easy cleanup, while tear-away stabilisers are the practical choice for sturdier cotton or linen. Getting this wrong leads to puckering, distortion, and a finish that falls short of the elegance you are aiming for.
Here is a concise overview of the core materials you will need:
| Material | Purpose | Recommended type |
|---|---|---|
| Fabric | The wrap itself | Linen or cotton, medium weight |
| Stabiliser | Supports fabric during stitching | Tear-away for cotton; water-soluble for delicate weaves |
| Embroidery thread | Creates the design | Polyester or cotton 40-weight |
| Fusible interfacing | Prevents flap distortion | Medium-weight woven fusible |
| Closure | Seals the finished wrap | Pearl button or 30 cm ribbon |
Beyond fabric and stabiliser, you will need an embroidery hoop, sharp fabric scissors, water-soluble marking pens, and either a domestic embroidery machine or a set of hand embroidery needles. For those sourcing supplies, craft tutorials and stabiliser guides can help you identify the correct weights and adhesive sprays for your chosen fabric.
Pro Tip: Always test your stabiliser and thread combination on a fabric scrap before committing to your wrap. A five-minute test prevents hours of unpicking.
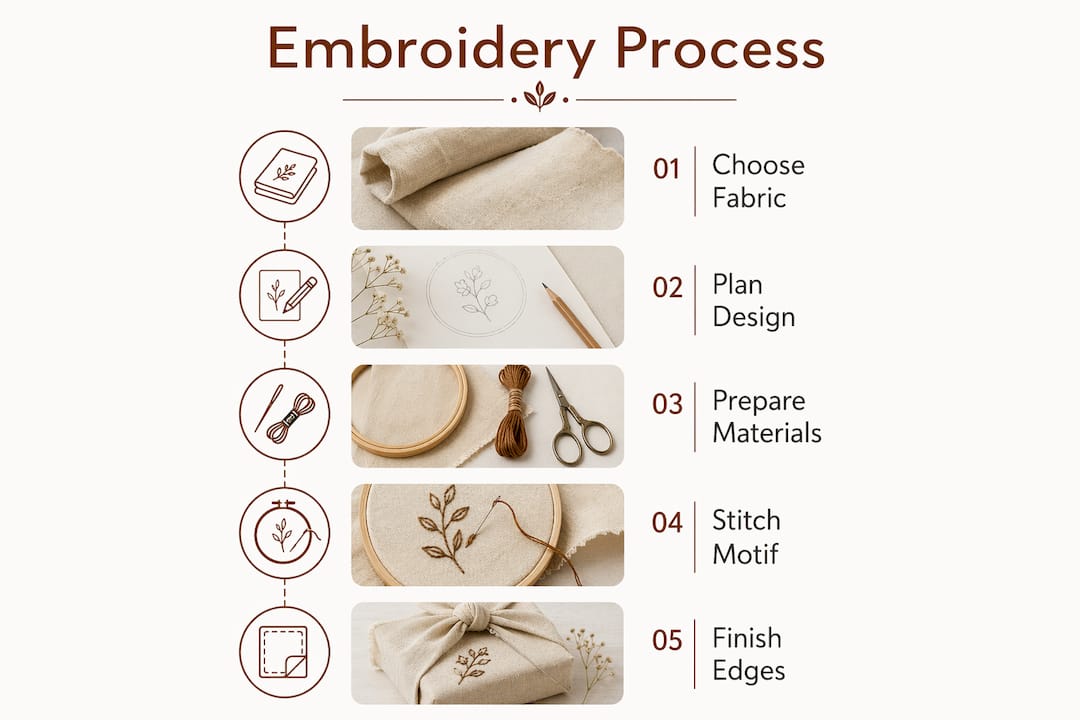
How do you plan and position embroidery designs on fabric wraps?
Design planning is where the artistry begins, and where most first-time makers lose confidence unnecessarily. Experienced embroiderers use paper templates or machine fabric scanners before hooping to ensure perfect design placement and avoid tension issues caused by hooping pre-assembled pouches. The principle is simple: plan on paper before you touch the fabric.
Follow these steps to prepare your design with confidence:
- Cut your fabric to the finished size, adding a seam allowance of between 3/8 and 1/2 inch on all sides.
- Create a full-size paper template of your fabric piece and sketch your chosen motif onto it, positioning the design 2 to 3 inches from the flap or fold edge for visual balance.
- Transfer the placement marks to your fabric using a water-soluble pen, which disappears with a light mist of water once stitching is complete.
- Apply fusible interfacing to the reverse of the area you plan to embroider, pressing gently with a warm iron to bond the layers without distorting the weave.
- Hoop the flat, unassembled fabric with your chosen stabiliser beneath it, ensuring the grain is straight and the fabric lies without tension.
- Load your design file into your embroidery machine, or transfer your traced hand-embroidery pattern, and confirm the stitch-out preview aligns with your placement marks.
The critical rule here is to embroider on flat, unassembled fabric. Attempting to stitch a pre-sewn pouch creates hooping difficulties, uneven tension, and a finished design that sits slightly off-centre, which is the one detail that separates a thoughtful gift from a truly refined one.
Pro Tip: For baby names or birth dates, choose a subtle script font at a size no smaller than 15 mm in height. Anything smaller risks losing legibility after washing.
How do you stitch and assemble an embroidered gift wrap?
With your design planned and your fabric prepared, the stitching and assembly process follows a clear sequence. Embroidered fabric gift bags typically take between 30 and 60 minutes per piece depending on complexity, using either traditional hoop-and-stitch or In-the-Hoop (ITH) techniques. ITH methods are particularly efficient for producing consistent results when making several wraps for a baby shower.
Machine embroidery process:
- Set your embroidery machine speed to approximately 80% of its maximum to avoid thread breakage, particularly on linen where the weave can create resistance.
- Stitch the design on the flat fabric flap before any assembly begins, removing the stabiliser carefully once complete.
- Place the two fabric pieces right sides together and sew around the edges, leaving a 4 cm gap for turning the wrap right-side out.
- Clip the corners, turn the wrap through the gap, and press gently using a pressing cloth over the embroidered area to protect the thread.
- Close the turning gap with a neat slip stitch, then attach your chosen closure.
Hand embroidery process:
- Transfer your design using a lightbox or window tracing method onto the flat fabric.
- Work your chosen stitches, such as satin stitch for filled motifs or backstitch for outlines and lettering, keeping tension even throughout.
- Hand embroidery takes longer but produces a texture and depth that machine work cannot fully replicate, and many recipients find it even more moving.
For closures, a 30 cm ribbon or pearl button are both elegant choices that suit the refined aesthetic of a personalised wrap. Ribbons can be secured inside the hoop during ITH construction by laying them flat before the final stitching pass, which prevents any risk of the ribbon shifting during assembly.
What are the best personalised embroidery ideas for newborns and birthdays?
The most enduring embroidered gift wrapping ideas share one quality: restraint. As experts note, “less is more” in embroidery design. A single name in a flowing script, or a small woodland creature beside a birth date, carries far more emotional weight than a densely stitched scene. Simple redwork or monograms are both time-efficient and deeply elegant.
For newborn gifts and baby showers, consider these design directions:
- Monograms and names: A baby’s initials in a classic serif font, or their full first name in a soft cursive, transforms the wrap into a named possession from the very first moment it is received.
- Birth date and weight: Stitching “12.03.2026 · 7lb 4oz” onto a wrap creates a record that no card or paper label could preserve with the same permanence.
- Nature-inspired motifs: Woodland rabbits, sleeping foxes, delicate botanicals, and morning stars all translate beautifully into embroidery and suit the gentle palette of a nursery.
- Birthday themes: For a child’s first or second birthday, a small embroidered number alongside their name gives the wrap a celebratory identity without veering into the disposable.
- Keepsake pouches: Once the gift is unwrapped, the fabric pouch becomes a storage vessel for small treasures, a first tooth, a hospital bracelet, or a lock of hair, making the wrap a living part of the child’s story.
The personalisation options available through embroidery extend well beyond names, encompassing motifs, monograms, and custom colour palettes that reflect the personality of both giver and recipient.
How do you care for and reuse embroidered fabric wraps?
A well-made embroidered wrap, cared for properly, will outlast hundreds of rolls of wrapping paper. Pressing uses a pressing cloth over the embroidery and ironing from the reverse to avoid scorching and thread dulling, particularly for heat-sensitive fabrics like linen. Always test your iron temperature on a fabric scrap before pressing the finished piece.
For washing, turn the wrap inside out and launder on a gentle cool cycle. Avoid tumble drying, which can distort the embroidery and shrink linen. Lay flat or hang to dry, then press from the reverse as described above. These simple steps preserve the luminous quality of the thread and the crisp structure of the fabric for years of reuse.
Modular closures such as buttons or ribbons are recommended over permanent assembly, as they allow the recipient to open and refold the wrap for future occasions. When you give an embroidered wrap, include a small note explaining how to care for it and encouraging the recipient to reuse it. This small gesture shifts the entire philosophy of the gift from consumption to custodianship.
Pro Tip: Attach a small fabric care label to the inside seam of your wrap before assembly. A simple printed or hand-stitched label reading “Wash cool, press reverse” takes moments to add and ensures the wrap is cared for correctly by whoever receives it.
- Wash on a gentle cool cycle, inside out
- Press from the reverse using a pressing cloth
- Store folded in a drawer or displayed as a decorative piece
- Reuse as a pouch, storage bag, or wrap for future gifts
Key takeaways
Embroidered fabric gift wraps are the most meaningful and sustainable choice for newborn, baby shower, and birthday gifts because they combine personalisation, reusability, and heirloom quality in a single piece.
| Point | Details |
|---|---|
| Choose the right fabric | Linen and cotton offer the best drape, durability, and embroidery surface for reusable wraps. |
| Plan before you stitch | Use paper templates and position designs 2 to 3 inches from flap edges for balanced, elegant results. |
| Embroider before assembly | Always stitch on flat, unassembled fabric to avoid tension issues and off-centre designs. |
| Keep designs simple | A single name, monogram, or small motif carries more emotional resonance than complex scenes. |
| Care preserves longevity | Gentle washing and pressing from the reverse protects embroidery thread and fabric structure for years of reuse. |
Why embroidered wraps changed how I think about gifting
Helen’s perspective
I have wrapped a great many gifts over the years, and I can say with conviction that nothing I have ever folded in paper has been remembered by the person who received it. The paper is gone before the thank-you note is written. What stays is the object inside, and sometimes, if you are fortunate, the feeling of being truly seen by the person who chose it.
Embroidered wraps changed that for me. The first time I gave a wrap stitched with a newborn’s name, the mother set the gift aside and held the wrap for a long moment, tracing the letters with her finger. That is not something that happens with tissue paper and a ribbon. It happens when the wrapping itself carries intention.
The sustainability argument is real and worth making, but it is almost secondary to the emotional one. We are not simply reducing waste when we choose reusable fabric. We are asking the recipient to keep something, to fold it away and bring it out again, to let it become part of their home. That is a different kind of giving entirely, and once you have experienced it, the idea of wrapping a newborn gift in paper that will be in the bin before the baby is home from hospital feels genuinely sad.
— Helen
Discover beautifully crafted reusable wraps at Nicholasandrose
For those who love the idea of a personalised, embroidered gift wrap but prefer a beautifully finished piece over a DIY project, Nicholasandrose offers an exquisite solution. The Woodland Rabbit reusable furoshiki wrap in Duck Egg is a luminous example of sustainable luxury, designed specifically for newborn and toddler gifts and crafted to be personalised with embroidery.
Each wrap from Nicholasandrose is made to be kept, not discarded. The 2026 newborn and toddler range brings together refined design, eco-conscious materials, and bespoke personalisation options, so the wrap becomes a cherished memento long after the gift inside has been loved and outgrown. Explore the full collection at Nicholasandrose and discover how embroidery elevates sustainable gifting for the families who matter most.
FAQ
What fabric is best for embroidered gift wraps?
Linen and cotton are the preferred choices for embroidered gift wraps, offering durability, a beautiful drape, and a surface that holds embroidery thread cleanly. Medium-weight woven fusible interfacing applied to the back of the embroidery area prevents stretching and improves the finished structure.
How long does it take to make an embroidered fabric wrap?
An embroidered fabric gift wrap typically takes between 30 and 60 minutes per piece, depending on the complexity of the design and whether you use machine or hand embroidery. Simpler designs such as a name or monogram sit at the lower end of that range.
Can embroidered wraps be washed and reused?
Yes. Wash embroidered wraps on a gentle cool cycle inside out, then press from the reverse using a pressing cloth to protect the thread. Cared for correctly, a well-made embroidered wrap will remain beautiful through many years of reuse.
What embroidery designs work best for newborn gifts?
A baby’s name in a soft script font, birth date, or a small nature-inspired motif such as a woodland rabbit or sleeping fox are all elegant and time-efficient choices. Simple designs carry the greatest emotional resonance and are the most practical to stitch cleanly on fabric.
Do I need an embroidery machine to make fabric gift wraps?
No. Hand embroidery using backstitch, satin stitch, or simple redwork produces beautiful results on fabric wraps, though it takes longer than machine embroidery. Both methods require the design to be stitched on flat, unassembled fabric before the wrap is sewn together.
Recommended
- Embroidery personalisation ideas for baby and kids – Nicholas & Rose Limited
- How embroidery elevates sustainable gift wrap for eco-parents – Nicholas & Rose Limited
- 6 Steps for a Personalised Wrap Checklist Parents Need – Nicholas & Rose Limited
- How to Personalise Gift Wrap with Embroidered Fabric – Nicholas & Rose Limited